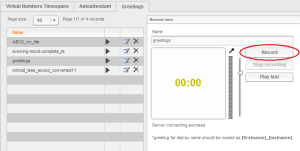
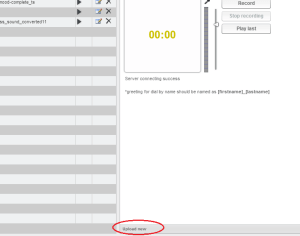
This module allows you to record your own greetings for answering rules or welcome messages.
There is also an option to upload an existing file.
Step 1: Login to your CloudBharat Hosted PBX Portal
http://www.calncall.com/login/login-hosted-pbx/
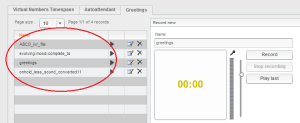
Step 2: Go to Auto Attendant/Greetings –> Greetings
You can upload new greetings or record a new file.
Note : Please note that file to upload must be *.wav PCM 16-bit 8kHz mono format
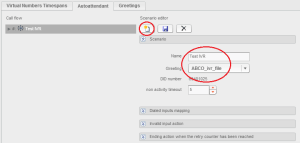
Auto attendant
Step 1: Go to Auto attendant > New > Select IVR file
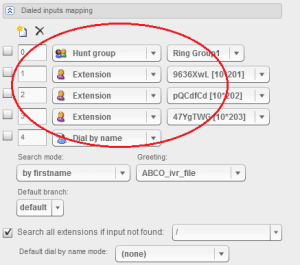
Step 2: Dialled inputs mapping
The Dialled inputs mapping panel allows you to create a connection between an input number and an extension, an external number or other scenarios. Click the create new icon and choose from the dropdown list (e.g extension – and user name). You can search all extensions if the input number is not found. You can set the default dial by name mode – and select the name mode to be used.
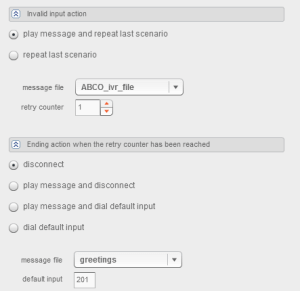
Step 3: Invalid input action
You can set an action when a caller enters an invalid input. e.g. Play message and repeat the last scenario.
Select a message file (Invalid input message) and enter a value for the retry counter. This specifies how many invalid inputs the pbx will allow.
Step 4: Ending action when the retry counter has been reached
The final panel sets up an action when the retry counter has been reached. e.g. disconnect. A message file can be selected to play with the selected action.
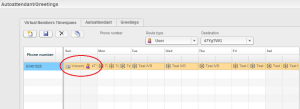
3. Virtual Numbers’ Timespans
Timespans allows you to create access for phone numbers that are assigned to PBX clients based on a weekly timeline. For example, if a PBX client purchased 2 phone numbers, it would be possible to set up two different time accesses for each number. You can assign a particular number by various route types (drop-down list) to different destinations (drop-down list).
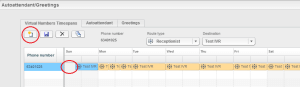
Route type – select from the following routes in a drop-down list:
- Direct – allows you to choose individual PBX users.
- Receptionist – numbers can be assigned to the receptionist (dropdown destination for created list of scenarios)
- Voicemail – (destination dropdown of greeting messages on the PBX)
- Hunt groups – (destination dropdown list of created hunt groups)
- Fax box
- Destination – select from a drop-down list of PBX user accounts, hunt groups, receptionist scenarios, etc.
Using Timespans, each number can be assigned different functions on different days – and even different hours.
To add a timespan, highlight the Phone number from the list to the left. Then select the day you wish to edit.
Click the ‘Add new’ icon to add an action, and select the Route type, and the appropriate entry from the ‘Destination’ field from the drop-down list available.
Note: Route types (e.g. Scenarios, Hunt groups and Greetings messages) need to be set up first before they appear in the ‘Destination’ drop-down list to be selected.
Timespan entries can be adjusted in size by dragging from the edge of the cell to fit the time span you wish.
EXAMPLE SCENARIO
e.g. One number selected from the list of phone numbers to the left of the module could, for example, be set up as follows:
- On Sunday it is assigned to ‘Route type’ – ‘Receptionist’ and ‘Destination’ – the receptionist scenario ‘Out of Hours’.
- On Mon, Tues and Wed it is assigned to ‘Route type’ – ‘Hunt Group’ and ‘Destination’ – the hunt group ‘Services’
- On Thurs and Fri it is assigned to ‘Route type’ – ‘Direct’ to the ‘Destination’ – a pbx user account (e.g sarah white)
- And on Sat to ‘Route type’ – Receptionist and ‘Destination’ – the receptionist scenario ‘Welcome’ Icon
When setting up a timespan all fields for each day must be fully occupied. If, for example, your office is open from 8am to 4pm on a Saturday, you can drag the timespan to the appropriate hours. The remaining hours of that day still need to be filled. You can, for example, fill them with Route type – Receptionist to the Destination receptionist scenario ‘Out of hours’, or alternatively to ‘Route type’ – ‘Group Voicemail’ to the ‘Destination’ – group ‘Services’ . Icon
REMEMBER.
All Receptionist scenarios, Hunt groups and Voicemail greetings must first be created before they appear in the Destinations field dropdown lists.